This page gets you from clone to first successful command quickly, then shows developer-oriented flow and output/report locations.
1. Environment
OpenTestability runs on Linux (and macOS) with a Python virtual environment. If you use Nix, you can skip this section entirely – jump to the Nix path, which pins everything for you.
Requirements:
- Python 3.10+
- GCC (to compile the Cython SCOAP kernel)
- Graphviz (for visualization, optional)
- pip
Example for Ubuntu/Debian:
sudo apt-get update
sudo apt-get install -y python3 python3-venv python3-pip gcc graphviz
2. Install
git clone https://github.com/ranaumarnadeem/OpenTestability.git
cd OpenTestability

python3 -m venv venv
source venv/bin/activate
pip install -r requirements.txt
pip install -e .          # compiles the Cython SCOAP kernel (_kernels.so)
Alternative: Nix (no clone, no venv)
The repo ships a flake.nix, so with Nix (flakes
enabled) you can run or install OpenTestability without cloning or building
anything yourself.
Run it once, without installing:
nix run github:ranaumarnadeem/OpenTestability -- scoap -i design.json -j
Install a persistent opentest command into your profile:
nix profile install github:ranaumarnadeem/OpenTestability
Pin to a released version by appending the tag:
nix run github:ranaumarnadeem/OpenTestability/v0.0.1 -- --help
Contributor dev shell (Python + GCC + Yosys; it runs the editable install for
you, so you do not need a separate pip install -e .):
nix develop               # from a local clone
pytest tests/ -q
Add OpenTestability as a dependency of your own flake:
inputs.opentestability.url = "github:ranaumarnadeem/OpenTestability";
3. Input format
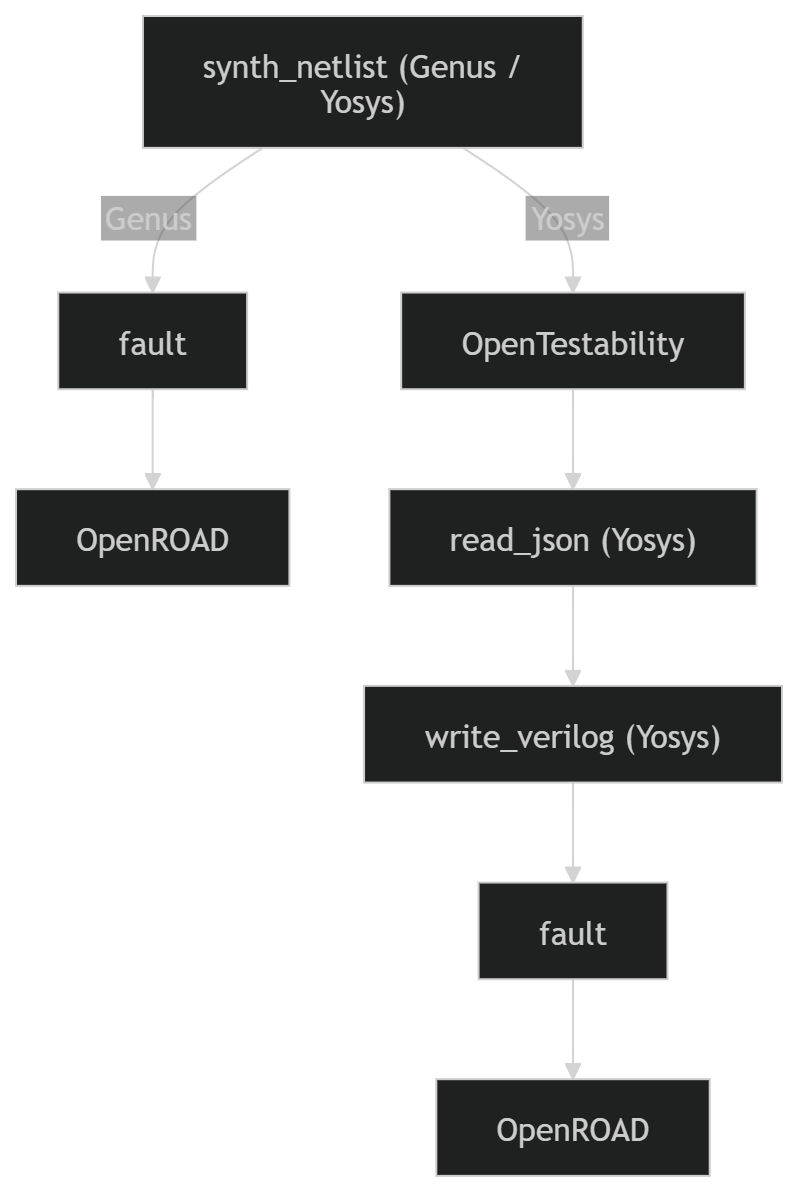
OpenTestability ingests Yosys JSON netlists – this is the only supported input format. Convert a Verilog netlist with Yosys first:
yosys -p "read_verilog design.v; synth; write_json design.json"
A leading --yosys flag is accepted on any command and ignored, kept only for
backward compatibility with older invocations – there is no separate
“non-Yosys” mode to select anymore.
Direct Verilog parsing (the old pyverilog-based “genus” mode) was removed. The
full implementation is archived on the legacy-genus branch. See the
Genus (Legacy Verilog) Mode page for its complete command
reference and how to check it out.
4. First successful run
python3 opentest help
python3 opentest scoap -i <design.json> -j
If your run succeeds, outputs are written under project data/result folders and optional reports are created in results/ when verbose mode is enabled.
5. Verbose mode (recommended for debugging)
python3 opentest --verbose scoap -i <design.json>
python3 opentest --verbose cop -i <design.json> -j
Verbose mode generates:
- detailed session logs in
results/log/ - timestamped reports in
results/reports/
6. DFT Flow
Typical command sequence (example):
# 1) Analyze and insert test points, emitting an enhanced Yosys JSON netlist
python3 opentest analyze_and_add_tp -i <design.json> --scoap -t 50 -m 10 -v

# 2) Feed the enhanced netlist to downstream tools
# fault ... <design_tp.json>
# openroad ... <design_tp.json>
7. Full example
# 1) Build Yosys JSON
yosys -p "read_verilog designs/priority_enc.v; synth -top priority_enc; write_json output/priority_enc.json"

# 2) Run OpenTest
python3 opentest scoap -i output/priority_enc.json
python3 opentest analyze_and_add_tp -i output/priority_enc.json --scoap -t 50 -m 10 -v

# With technology selection (sky130 is the default)
python3 opentest analyze_and_add_tp -i output/priority_enc.json --scoap -t 50 -m 10 --tech sky130 -v

# With reconvergence-aware analysis
python3 opentest analyze_and_add_tp -i output/priority_enc.json --scoap -r -t 50 -m 10 --tech sky130 -v
--tech selects which PDK buffer and mux cells are used when inserting test points. Supported values: sky130, osu035, ihp, nangate, auto (auto-detects from cell names in the netlist).
8. Where reports and outputs are written
results/log/logN.txt: verbose run logs (sequentially numbered)results/log/sessionN.cmd: per-session command historyresults/reports/*: timestamped run reportsdata/results/*: metrics files (COP/SCOAP text/json)data/TPI/*andoutput/*: generated enhanced netlists and flow artifacts
9. Developer quick-start and structure
Developer setup:
source venv/bin/activate
pytest tests/ -v
pytest tests/ -m smoke -v
Top-level structure (developer view):
OpenTestability/
|-- opentest
|-- src/opentestability/
|-- docs/
|-- tests/
|   |-- unit/
|   |-- integration/
|   |-- system/
|   `-- fixtures/
|-- data/
|-- results/
`-- output/